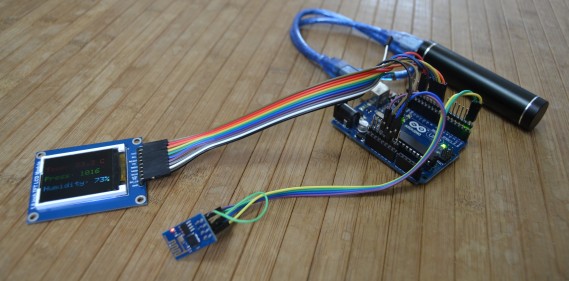
This is my first attempt to receive data with an Arduino and the ESP8266 WiFi-Module. This program is based on the example by Seedstudio, and displays weather data on a small TFT display.
The Modul

I bought this module at Electrodragon. This Version has two LEDs, one for Power and another one which is connected to the TX-Pin. It runs at 3.3 Volt and the serial port is set to a data rate of 115200 baud. The CH_PD-Pin has to be high. After a reset, the module sends the following data:
[code]
AT+RST
OK
ets Jan 8 2013,rst cause:4, boot mode:(3,6)
wdt reset
load 0x40100000, len 24236, room 16
tail 12
chksum 0xb7
ho 0 tail 12 room 4
load 0x3ffe8000, len 3008, room 12
tail 4
chksum 0x2c
load 0x3ffe8bc0, len 4816, room 4
tail 12
chksum 0x46
csum 0x46
ready
[/code]
Wiring
The wiring is quite simple. The wifi-module needs just two wires for power and two for the serial interface. As a display i used a 1.8″ (45.72 mm) TFT-display that is connected via SPI.
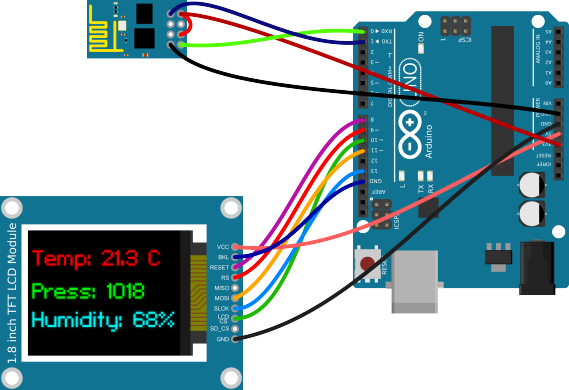
| Arduino | ESP8266 Module | Display Module |
|---|---|---|
| 3.3V | VCC & CH_PD | – |
| 5V | – | VCC |
| GND | GND | GND & BKL |
| 0 (RX) | TX | – |
| 1 (TX) | RX | – |
| 8 | – | RESET |
| 9 | – | RS |
| 10 | – | LCD CS |
| 11 | – | MOSI |
| 13 | – | SLCK |
The Program
I changed the source code from Seedstudio a little bit, because at 115200 baud the 64 Byte uart-buffer from the Arduino fills up very fast. But overall the program is really simple.
[code language=”java”]
#include <SoftwareSerial.h>
#include <JsonParser.h>
#define cs 10 // Pins for the display
#define dc 9
#define rst 8
#include <Adafruit_GFX.h> // Core graphics library
#include <Adafruit_ST7735.h> // Hardware-specific library
#include <SPI.h>
Adafruit_ST7735 tft = Adafruit_ST7735(cs, dc, rst);
using namespace ArduinoJson::Parser;
#define SSID "<ssid>" // insert your SSID
#define PASS "<password>" // insert your password
#define LOCATIONID "2925533" // location id
#define DST_IP "188.226.224.148" //api.openweathermap.org
SoftwareSerial dbgSerial(2, 3); // RX, TX for debugging
JsonParser<32> parser;
void setup()
{
Serial.begin(115200);
Serial.setTimeout(5000);
dbgSerial.begin(9600); // for debuging
dbgSerial.println("Init");
tft.initR(INITR_BLACKTAB);
tft.setRotation(1);
tft.fillScreen(ST7735_BLACK);
tft.setCursor(2, 2);
tft.setTextColor(ST7735_WHITE);
Serial.println("AT+RST"); // restet and test if module is redy
delay(1000);
if(Serial.find("ready")) {
dbgSerial.println("WiFi – Module is ready");
tft.println("WiFi – Module is ready");
}else{
dbgSerial.println("Module dosn’t respond.");
tft.println("Module dosn’t respond.");
tft.println("Please reset.");
while(1);
}
delay(1000);
// try to connect to wifi
boolean connected=false;
for(int i=0;i<5;i++){
if(connectWiFi()){
connected = true;
tft.println("Connected to WiFi…");
break;
}
}
if (!connected){
tft.println("Coudn’t connect to WiFi.");
while(1);
}
delay(5000);
Serial.println("AT+CIPMUX=0"); // set to single connection mode
}
void loop()
{
String cmd = "AT+CIPSTART=\"TCP\",\"";
cmd += DST_IP;
cmd += "\",80";
Serial.println(cmd);
dbgSerial.println(cmd);
if(Serial.find("Error")) return;
cmd = "GET /data/2.5/weather?id=";
cmd += LOCATIONID;
cmd += " HTTP/1.0\r\nHost: api.openweathermap.org\r\n\r\n";
Serial.print("AT+CIPSEND=");
Serial.println(cmd.length());
if(Serial.find(">")){
dbgSerial.print(">");
}else{
Serial.println("AT+CIPCLOSE");
dbgSerial.println("connection timeout");
tft.fillScreen(ST7735_BLACK);
tft.setCursor(2, 2);
tft.setTextColor(ST7735_WHITE);
tft.println("connection timeout");
delay(1000);
return;
}
Serial.print(cmd);
unsigned int i = 0; //timeout counter
int n = 1; // char counter
char json[100]="{";
while (!Serial.find("\"main\":{")){} // find the part we are interested in.
while (i<60000) {
if(Serial.available()) {
char c = Serial.read();
json[n]=c;
if(c==’}’) break;
n++;
i=0;
}
i++;
}
dbgSerial.println(json);
JsonObject root = parser.parse(json);
double temp = root["temp"];
double pressure = root["pressure"];
double humidity = root["humidity"];
temp -= 273.15; // from kelvin to degree celsius
tft.fillScreen(ST7735_BLACK);
tft.setCursor(2, 25);
tft.setTextColor(ST7735_BLUE);
tft.setTextSize(2);
tft.print("Temp: ");
tft.print((int)temp);
tft.print(".");
tft.print((int)((temp-(int)temp)*10));
tft.println(" C");
tft.setCursor(2, 55);
tft.setTextColor(ST7735_GREEN);
tft.setTextSize(2);
tft.print("Press: ");
tft.print((int)pressure);
tft.setCursor(2, 85);
tft.setTextColor(ST7735_YELLOW);
tft.setTextSize(2);
tft.print("Humidity: ");
tft.print((int)humidity);
tft.println("%");
dbgSerial.println(temp);
dbgSerial.println(pressure);
dbgSerial.println(humidity);
dbgSerial.println("====");
delay(600000);
}
boolean connectWiFi()
{
Serial.println("AT+CWMODE=1");
String cmd="AT+CWJAP=\"";
cmd+=SSID;
cmd+="\",\"";
cmd+=PASS;
cmd+="\"";
dbgSerial.println(cmd);
Serial.println(cmd);
delay(2000);
if(Serial.find("OK")){
dbgSerial.println("OK, Connected to WiFi.");
return true;
}else{
dbgSerial.println("Can not connect to the WiFi.");
return false;
}
}
[/code]
Conclusion
The program is quite simple and could be extended with more features like a weather forecast. If you have any comments about the source code leave it down below. I hope i don’t have to many spelling mistakes in my first English post 🙂
Update: There was a bug in the code, which was found by Jody Roth. This is now fixed.
Great hack! But, I’m actually just as curious about your power supply. Looks like you’re using a standard cell phone charger, but curious how you’ve got it wired. From the picture it looks like you’ve wired into what would be both the power input and the output ports (at least, the one I have is like that).
Hey, i’m not quite sure what you mean. To Power the Arduino i use a “USB Power Bank” (close up), which can be charged via micro USB.
Yeah, pretty much the one I’ve got. Now that I’m looking at the picture closer, it looks like you’ve only got one cable, it’s just looped. At quick glance, it looked like you had two cables plugged into it.
No problem with the logical level of 3.3V in the ESP8266 and 5V in the Arduino UNO ?
No, this worked quite nice.
I once read a statement saying that putting a 5V signal into a 3.3V-only port can cause eventual failure of the port.
Thanks for posting this project. You did a great job illustrating the connections, I received from ElectroDragon the ESP8266 version that doesn’t have the power LED, I think it’s loosely being called a Revision 1. I tried to replicate your project but it seems my board just doesn’t want to work the same way. It bugs out after connecting to the AP, unable to retrieve data from the open weather site.
Anyway, keep up the great work!
rev1 of the board (without LEDs) works with 57600 baud
I have it running at 57600 baud, I think a lot of my initial problems were operator error. I Needed to manually reset power and wait long enough before starting the sketch. I don’t have a TFT so I had removed that portion of the code and inserted a software serial for debugging. I probably screwed something up. This time I went back to the original sketch from zybuluo and brought in the relevant weather code from this sketch and now I’m rolling down the right road.
Bottom line: The version 1 works just fine.
btw, Line 72 should have a += to concatenate the string properly.
Thanks again for your great post!
Thanks for reporting the bug!
Unfortunately, i don’t have “Version 1”, so i don’t know what the differences in the firmware are. Maybe I’ll get one module to test the setup with.
Entering the URL to the domain in a normal browser, I notice the page returns a 404. So either there’s a typo in the code, or the site has been changed since then. 😉
These serial/internet modules seem to be quite popular these days…. any idea how this compares to the other ones like HI-LINK HLK-RM04 ? Or even the wired flavors, like microchip enc28j60?
In the past people ported a tcp/ip stack to a processor and just used a chip for the physical layer. Is that approach been replaced by using a chip like with everything already on it? Especially for those IoT applications that don’t require lots of bandwidth?
Hey, there are quite a few modules out there. As you said, the ENC18J60 (ethernet controller) don’t has a tcp/ip stack on it, while the W5100 has one.
Most WiFi-modules (CC3000,USR-WIFI232-T,HC-21) also have an tcp/ip stack on board and everything for an encrypted WEP, WPA, WPA2 connection.
The HI-LINK HLK-RM04 is based on a RT5350 and even runs Linux (OpenWRT for example) on it.
From the application above, it looks like the ESP8266 also has a tcp/ip stack on it.. do you think it’s possible to get the ESP8266 to just pass raw data to a external tcp/ip stack like uip?
I had been looking at the wifi module from microchip.. it’s nice because you can use their closed source tcp/ip stack to make sure everything works and then transition to uip. But it’s much pricier than this!
BTW, is the ESP8266 protocol very common? I recall seeing that “AT” on some other device.. can’t remember where though!
As far as i know the ESP8266 runs a firmware which is stored on the external flash-chip. I also hope that soon some people come up with an open source firmware. This way you could send raw data, or even create your own tcp/ip stack. But i don’t think the current firmware supports sending raw data.
I think this “AT-commands” are loosely based on the Hayes command set.
The wifi component is 3.3v.
clearly you’re getting the device power from the 3.3v line on the Arduino, but isn’t the signal line also 5v? Won’t that damage the component?
What can i say. I just tried it and it didn’t fried the module. Some circuits work with a certain voltage, but can tolerate a higher voltage on their input ports. Having said that, i can’t guarantee that it will work for you or anybody else. 🙂
Hello
Very cool project !
Regarding 3.3 V signals:
According the datasheet maximum input voltage is 3.6V. See the translated data sheet https://nurdspace.nl/ESP8266#Digital_IO_pins
Did you use Fritzing for the drawing? If yes, would you provide the project or the ESP8266 part for download. Thanks.
Best regard
Thomas
Maker and Bookwriter
Hey Thomas, thanks for the information regarding the maximum input voltage.
I did not used Fritzing for the drawing, but if you want, you can download the drawing of the esp8266 as an svg-file.
Thanks for the download link.
Very interesting. I was wondering about the JsonParser.h librarey as that seems to need a hoist of other libraries (Foundation.h, PointsofInterest.h etc) any idea where to get these? Or did I get the wrong JsonParser.h?
I think I already got the right Json library: https://github.com/bblanchon/ArduinoJson
Yes, that’s the right one 🙂
Hi, I have tried using the supplied sketch but there appears to be something wrong around the ArduinoJson declaration. I believe I have correctly added the library “ArduinoJson above and it appears in the list of libraries but I get an error ‘ArduinoJson’ has not been declared and I can’t see a ‘JsonParser.h’ in the library though there is a .hpp
Also, there seems to have been an update to some of the library files in the last few hours so I was wondering if anything critical had changed.
Best regards,
Nigel
I could supply the full list of reported errors if this would help.
Any help would be really appreciated as I am rather new to all this.
i have the same problem. please help
You can find all sorts of stuff like this at http://www.esp8266.com we are building a community to develop cool gadgets like this weatherstation….. non profit, all fun!
Hello,
This is a nice tutorial, it helped me get my ESP8266 up and running. On another note, what program do you use for the drawings you created? They look nice.
Thanks,
Marcus
Hey, i used Inkscape to create the drawings. You can download the ESP8266-Module as a svg-drawing.
I tried for a couple of days to get one of the ESP8266 working, problem turned out to be my level shift with just resistors didn’t work as expected… Was slow to connect direct as the datasheet seemed to indicate the device was not 5 volts tolerant….
After finding your post I tried connecting directly (TX/RX) and voilà ….
Nice one 😉
hello everyone, can anybody do a simpler project with this? I just want to collect data using arduino Analog0 input with an LDR photoresistor. collect the data and simply post it on Thingspeak ?!?!
.
all the examples I find are very complicated and include libraries. I need my project to be much simpler. just read some data from the analog sensor and display the value on the cloud.
.
can anybody please help me with this? I have updated the firmware on my ESP8266 and I can connect to my house network using the CoolTerm software.
.
any help is highly appreciated !!!
thank you,
akin
well maybe a newbie question but your drawing does not show pins 2,3 are connected to something so what exactly SoftwareSerial is doing with them ?
This is really interesting, You’re a very skilled blogger.
I have joined your feed and look forward to seeking more of your wonderful post.
Also, I have shared your web site in my social networks!
I am in fact thankful to the owner of this site who has shared
this great post at at this place.
It’s awesome to pay a visit this web site and reading the views of all mates about this piece of writing, while I am also
keen of getting knowledge.
I have a problem connecting to my network, i sat up all things as it should be even SSID and PASS are correct, but it is always retuning “Can not connect to the WiFi.” Do you know why this is happening?
Thank you for your efforts.
Hey! This is kind of off topic but I need some help from an established
blog. Is it very hard to set up your own blog? I’m not very techincal but I can figure things out pretty fast.
I’m thinking about setting up my own but I’m not sure where to start.
Do you have any tips or suggestions? Many thanks
You will also need to be careful with citrus fruit because
they have a lot of citric acid in them. These fruits cannot be juiced in the Jack Lalanne Power
Juicer Pro. We found this space age juicer could swallow whole fruit or vegetables in an instant and produce great
tasting juice for the family to enjoy every time we
tried it.
It’s not my first time to visit this website, i am visiting this website dailly and get fastidious information from here everyday.
If some one wants to be updated with hottest technologies afterward he must be pay a visit this web page and be up to date daily.
I got this site from my buddy who told me about this web
page and at the moment this time I am visiting this web page and reading
very informative posts at this time.
I like the helpful info you provide in your articles.
I’ll bookmark your weblog and check again here frequently.
I am quite sure I will learn lots of new stuff right here!
Good luck for the next!
Can not get it work…
Compilation says in line 26 :”using namespace ArduinoJson::Parser;”
esp8266_weather:26: error: ‘ArduinoJson’ has not been declared
esp8266_weather:26: error: ‘Parser’ is not a namespace-name
esp8266_weather:26: error: expected namespace-name before ‘;’ token
Can You please help me??
Andreas
IMac OS X 10.6.8 and Arduino 1.0.5
You have to use Arduino 1.0.6 or later to work. That is because the ArduinoJson library (from bblanchon on github) has nested libraries. Arduino 1.0.5 doesn’t know about those.
Very good work!
I made a variation of your project. Instead of openweathermap I used the API for wunderground.
See the post at: http://thisoldgeek.blogspot.com/2015/01/esp8266-weather-display.html
Thanks for this…
I had a little bit of trouble getting the json library. Finally I opted to go for “ArduinoJson” from here: I followed the suggestions there to implement json parsing.
I noticed my version of your very nice sketch was not reading the humidity data correctly it was always 0. So I change the declaration from “double” to “byte” and worked perfectly. Thank you very much for your very clear and illustrative example!!!!
To those interested in battery power of zeflo’s project. Check out our Open Source Arduino Compatible, Li-Ion powered board which comes with the ESP8266 ready to use. You can plop the Adafruit SSD1306 OLED Display into it (as shown in one of the photos on the product page). It basically takes this project and squishes it into a smaller footprint.
Zeflo, e-mail me and I’ll see if I can get one out to you to play with.
http://ubld.it/products/wiot-board/
In this case probably not a big deal but… you included your api key
Hey, you connect
Arduino to ESP8266 Module
RX to TX
TX to RX
However, I found the following article connect
RX to RX
TX to TX
http://microcontrollerkits.blogspot.in/2015/02/wifi-module-esp8266-at-command-test.html
Please confirm, which is correct.
Is there a option to read and write the usb data from a other connection (man in the middle) with the esp8266?
Great work and Thanks.
I try to modify your code to use different display. and I have attached the link below the code. but I got error , I wish can see and help me.
https://www.dropbox.com/s/sclrbw2n3xfjpzv/ESP8266.ino?dl=0
thanks
Fantastic post . I was enlightened by the points . Does someone know where I could get ahold of a fillable DD 2813 form to type on ?
Ich habe nun meine Module erhalten und gemäß Tutorial den Aufbau vorgenommen.
Als Libraries habe ich installiert: ArduinoJson-master und ArduinoJsonParser-master .
Die anderen waren schon installiert von anderen kleinen Projekten.
Ich habe aber beim Kompilieren gleich eine Fehlermeldung in der Zeile:
using namespace ArduinoJson::Parser;
Fehlermeldung:
Wetter_ESP:12: error: ‘ArduinoJson’ has not been declared
Wetter_ESP:12: error: ‘Parser’ is not a namespace-name
Wetter_ESP:12: error: expected namespace-name before ‘;’ token
Hat jemand einen Tipp für mich Anfänger?
THIS FORUM IS DEAD
Warum gibt es hier keine Antworten mehr?
may i ask where are we getting the weather update from(according to this code)? and can we alter the code so that we can get the weather update from our own sensors??